
While there are a huge variety of herbs available in the Click & Grow pods, you can also grow pretty much any seed variety when you use the Experimental Grow Anything pods.
I love the flexibility these pods offer since I like experimenting with different herb varieties and trying new flavors. It’s always fun to grow a new twist on an old favorite, like Orange Thyme or Chocolate Mint.
In the following tutorial, we’ll walk through all the steps to planting whatever type of seed you like in the Experimental or Grow Anything Pods.
To get started, we’ll follow a process similar to planting the pre-seeded pods, with a few small changes.
Materials List

What you need to get started.
- Click & Grow Garden
- Plastic Growing Cups
- See-through Domes
- Experimental Grow Anything Pods
- Herb Seeds (10-20 per pod)
- An Electric Outlet

Step by Step Instructions for the Click & Grow Experimental Pods
Before planting, ensure all your equipment, including the plastic growing cups and the clear domes, is clean and dry.
Step 1: Prepare the Pods

Open the Grow Anything pods by peeling back the top. Inside the package is the growing medium which has been pretreated with all the fertilizer your seeds will need to grow into a mature and healthy plant.
Step 2: Place It Into The Plastic Cup
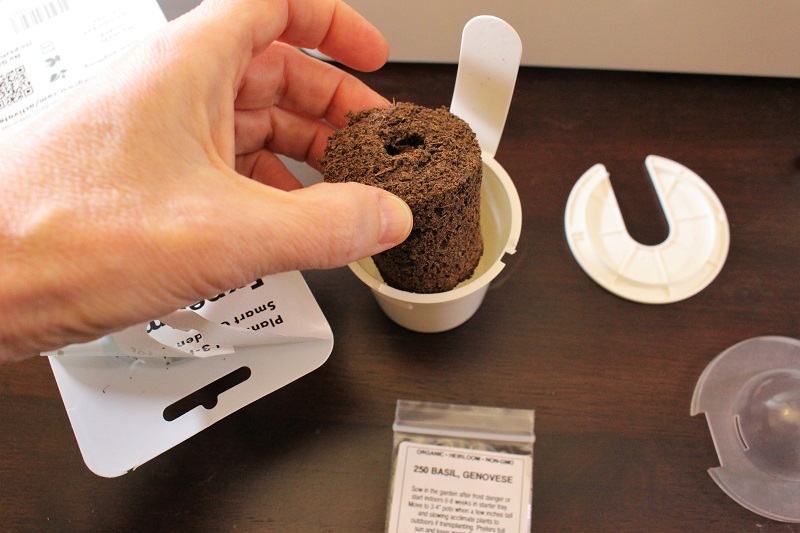
Remove the grow anything growing medium from its packaging and place it into the cup. Reseal the container if you aren’t using all the pods during this planting round.
Planting Tip: Make sure to wash your hands before handling the growing medium to ensure a sterile environment.
Step 3: Add Your Own Seeds

Sprinkle 10 to 20 seeds into the center of the pod. I am planting roughly 10 Genovese basil seeds in my Grow Anything Pod.
Note: We plant multiple herb seeds to get a larger harvest in a smaller space. If you are growing vegetables, see our FAQ section.
Try to get most of the seeds in the center of the growing pod. If seeds are planted on the ring, they may be covered by the lid and they won’t sprout.
Germination Tips
Most herb seeds will sprout fairly easily. But take note of the germination time so you know when to expect sprouts.
Also, review the preferred conditions for the specific variety of seeds you are planting. Some like it warmer, some like it cooler, and others like complete darkness. This information will be on your seed packet.
Most herb seeds germinate fairly easily, but there are a few exceptions. Knowing this ahead of time allows you to make adjustments if the seeds don’t sprout when expected.
For example, Chives seeds are part of the allium family and appreciate darkness for sprouting. In this case, the light may inhibit your seeds from sprouting. If you have trouble germinating chives, you may leave the unit unplugged until your seeds sprout.
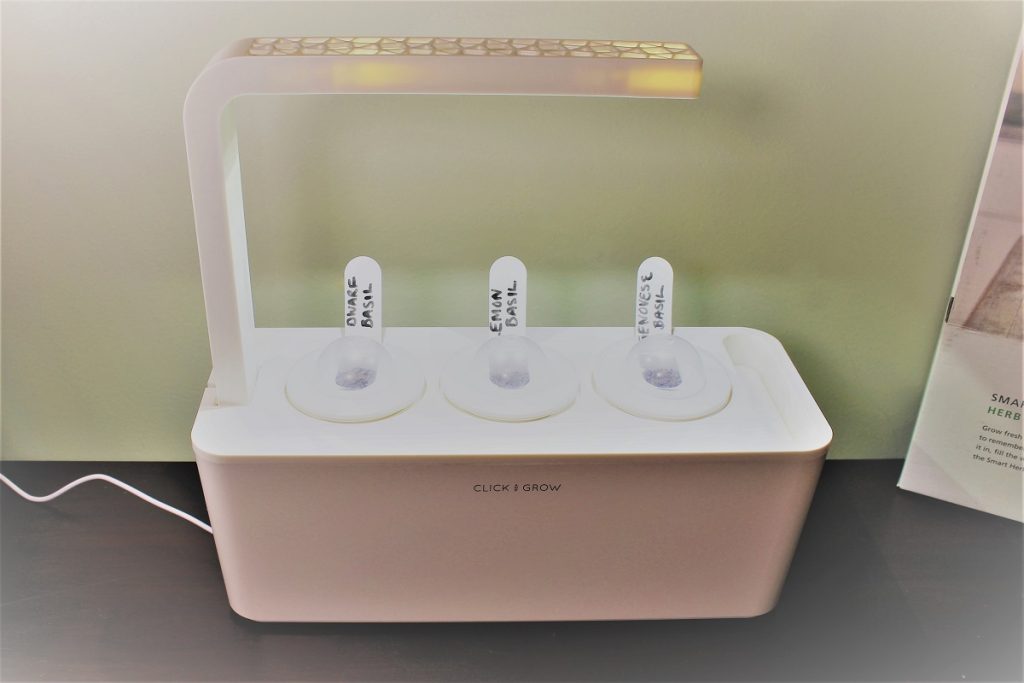
Step 4: Label Your Pods & Add Them To Your Click & Grow

Place the cups in your Click & Grow Garden and push down until you hear a slight click. Then, cover each pod with the clear plastic dome.
The dome will keep the humidity high and prevent the pods from drying out, aiding germination rates.
Step 5: Fill the Click & Grow with Water
Add the recommended amount of water to the Click & Grow reservoir. Just don’t add too much.
For example, the Smart Garden 3 holds 5 cups of water. When the water float starts to bob up and down, that means it’s time to stop adding water.
Step 6: Plug in the Light
For the majority of seeds, you will plug in the light source. This adds not only light but also a little bit of heat. The only time you may want to wait is when the seed packet explicitly says they germinate best in cold, dark conditions.
And that’s it. Now, you just wait for the seeds to sprout. The time it takes for germination will depend on the variety of seeds you are growing.
The whole process is fairly simple.
Where to Get More Information
The outer packaging contains a QR code that will link you directly to the Click & Grow product page. This page has additional instructions for any of the growing pods, and it’s super easy to use your smartphone.

To activate the QR code, follow these steps.
- Open your camera app from your smartphone
- Line up the QR code in the camera
- You should see a little pop-up that will say, “Open the click and grow in Safari (or whatever your app your phone uses)
- Click Yes
- The corresponding webpage should open.
Note: Some phones don’t have a scanner built into the camera. If the notice doesn’t pop up on your phone, you can also just type in the URL or use a scanner app like Google Lens.
Update – We Have Basil Seedlings!
The seeds sprouted in about 3 days. I waited a few more days until the seedlings had grown up and were peeking out of their pods, then removed the humidity dome. The dome is only needed during germination until the seedlings push their roots into the soil pods, where they will receive moisture from the planting medium.
Here, you can see the new basil seedlings growing in their pod.

Frequently Asked Questions When Using the Grow Anything Experimental Pods
Where Do I Get The Plastic Growing Cups?
Before you start, ensure you have the plastic cups from your last planting.
When you order the Click & Grow Experimental Pods, they ship only the growing medium since the plastic cups were designed to be re-used each time.
This is a very environmentally friendly way to plant, and they only ship the minimum product you need. There’s no reason to keep throwing away all these little plastic pots,
If you need more growing cups, you can order them on the Click & Grow storefront.

How Many Seeds Should I Plant?
As a general guideline, use the size of the plant and the type of harvest to determine the number of seeds.
If a plant is harder to germinate, you may want to increase the number of seeds to ensure success. For example, Rosemary is temperamental and can be tricky to start, whereas Basil is quick to sprout.
Herbs or Flowers: Plant 10-20 seeds. Use the upper limit for very small seeds or plants, like thyme. And the lower limit for larger herbs like basil.
Vegetables or Fruit: Plant 3 seeds in each pot and thin to the strongest plant after they sprout true leaves.
Lettuce or Leafy Greens: Plant 3 to 5 seeds in each pot
Note: When growing seedlings with the goal of repotting to individual plants, I reduce the number of seeds and thin to the strongest plant (or two) for growing on.
Why Do I Need So Many Seeds?
When you grow indoors, the best practice is to plant multiple seeds in each pot.
This does two things:
- Increases the number of harvestable leaves
- Allows for a few seeds that may not germinate
When growing herbs outdoors, there is plenty of room. So we typically grow all plants to maturity with adequate space in between each plant.
However, when growing indoors, space is limited. So instead of letting the individual plants reach their full potential, we grow several plants together and harvest the leaves at an earlier stage. Both herbs and flowers don’t mind being a little crowded.
Vegetables, such as tomatoes, may appreciate a little more room. So, if you are growing vegetables in your Grow Anything Pods, you will want to thin the sprouts to the single healthiest plant.
What Can You Grow In the Click and Grow Experimental Pods?
You can grow any type of seed that is well suited to growing indoors in the experimental pods. This includes herbs, vegetables, and most flowers. When choosing your plants, consider the mature size of the plant and match it to the size of Click and Grow Garden.
For example, in the Smart Garden 3, stick to herbs, leafy greens, and smaller vegetables and flowers. But if you are growing in the Smart Garden 27, you can grow larger vegetables.
If you are growing plant starts, then you can expand the type of seeds you are starting to almost any variety available! In fact, the Click and Grow Smart Garden is one of the easier ways to start seeds indoors.
Here are a few fun ideas to get you started:
- Start your own cocktail-inspired indoor garden with Mohito Mint, Lime Basil, and an Orange Scented Thyme.
- For the Herbal tea drinker, grow soothing Chamomile, Calendula, and Peppermint.
- The inspired chef may choose the petite Fernleaf Dill, Summer Savory, and Spicy Cilantro.
- If you have a feline friend, cat grass or catnip is fun to grow indoors.
- Do you work at home? Grow a scented indoor garden with Lavendar, Lemon Balm and Corsican Mint to brighten up your workspace.
What Will You Plant In Your Experimental Pods?
As you can see, there are plenty of ways to enjoy your Smart Garden by using the experimental pods.
Have fun creating your own combinations and trying out new herb varieties from the comfort and convenience of inside your home. The possibilities are endless!
Like It? Pin It!
