Step-by-step instructions to grow basil from seed at any time of year.
Basil is one of the easiest herbs to grow indoors from seed. Since basil is an annual, it grows very quickly. Sprouting from seed, producing an abundance of fresh leaves, then flowering and going to seed all over the course of a few months.
Many people choose to grow new basil plants from seed to get a jump start on the season or enjoy fresh basil leaves at any time of year.
When grown under the right factors, you can successfully grow this herb & be ready to harvest your plants in as little as 3-4 weeks!
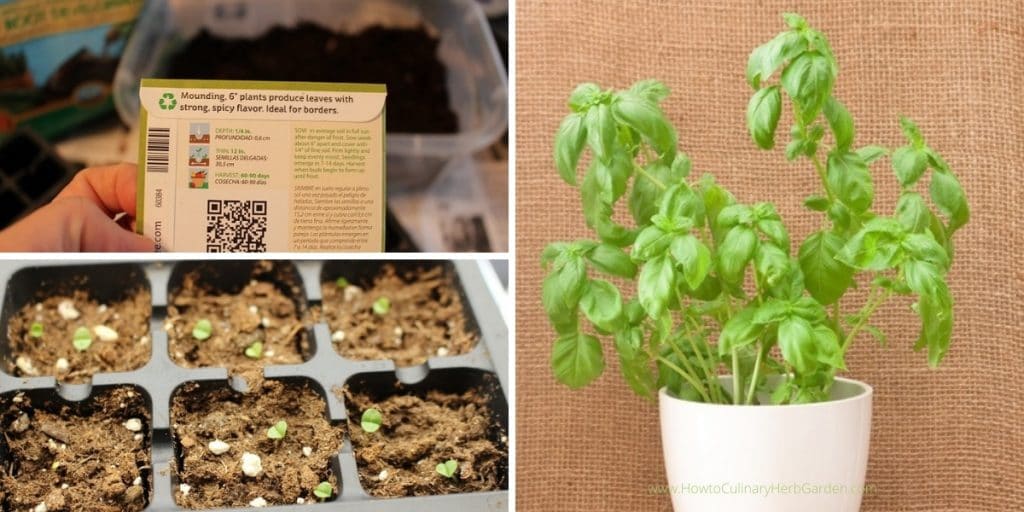
Be sure to pick up your basil seeds & follow along in our tutorial! Depending on the time of year, you can find them in home improvement or garden centers. Botanical Interests carries a wide variety of both organic and heirloom basil seeds if you prefer to buy them online or if it’s during the off-season.
Growing Basil Indoors: Step by Step Instructions
Here we will show you how to sprout your seeds, care for them, trim them for a bushy plant & enjoy your first harvest.

Materials
Here is everything you will need:
- Basil Seeds
- Starter Pots with drainage holes
- Plastic Dome
- Newspaper
- Seed Starting Mix
- Plastic Tub
- Spray Mister (sink sprayer is OK too)
- Sunny Window
- Variable Height Light Source
- Timer (optional)
- Fan (optional)
Instructions
Step 1: Preparation. Gather all your materials to a working area.

Step 2: Prepare the soil. Fill the plastic container with dry soil, add water & mix until your soil is just moist enough to hold together in your hand. Add just a little water at a time & mix well.
If you don’t want to get too dirty, you can use a big spoon to mix the soil initially. But it’s best to use your hands to test the consistency of the mixture especially when you are just starting out. If the soil is too wet, just add more dry soil until you have the right consistency.

Step 3: Fill your pot to about 1/2 to 1 inch below the top with the moistened soil.

Step 4: Plant a few seeds in each cell. Note: We always plant extra seeds in case a few don’t sprout.

Step 5: Cover the seeds with a sprinkling of dry soil to the depth suggested on the packet. If you don’t have the seed packet, the rule of thumb when planting seeds is to plant them to a depth of about twice their size.

Step 6: Mist your seeds with water or lightly spray them with the faucet. We want to ensure the seed has good contact with the soil, so it knows it is time to grow. If you expose any seeds when doing this just gently push them back into the soil.
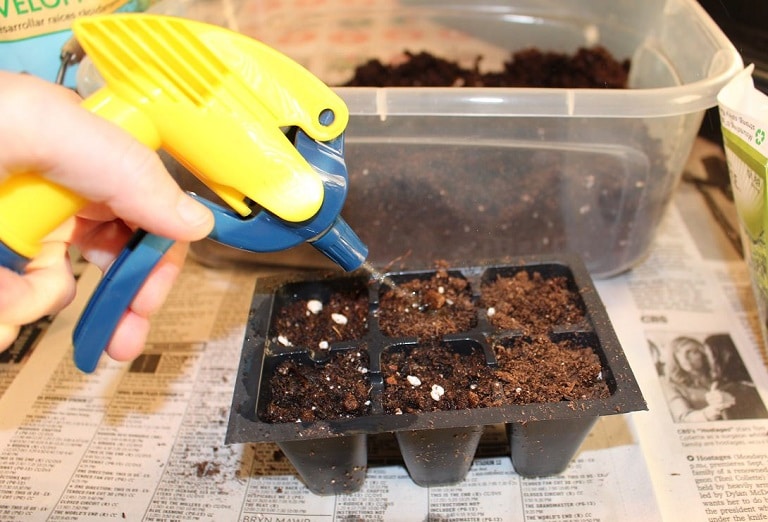
Step 7: Place a dome over your seeds to keep the moisture in. If the dome is kept in place, we should not need to water the seeds again until after they sprout.

Step 8: Place your seeds in a warm location – about 70 degrees & check them every day. Basil is very quick to germinate. You should see sprouts in 3-5 days, but it could be earlier or later depending on your home environment.

Step 9: Once you see sprouts, remove the dome immediately even if just 1 seed has germinated. Add supplemental lighting to promote strong growth, so your seedlings don’t become too leggy. See the section on light below for more details.
Seed Growing Pots
We like to use the plastic seed starting trays shown above for growing indoor seeds. They are easy to clean, reusable, and have been very reliable over the years. Individual small plastic pots are also a great choice.
Please try to avoid the little peat pots. They do not always decompose as advertised & instead can end up stunting your plant’s growth if the pot isn’t removed.
Here are two additional options if you prefer not to use plastic: Cow Pots & Paperboard Pots.

Cow Pots from Park Seed
These seed starter pots are made from…you guessed it…cow manure. They use a manure and fiber-based material that is made from composted cow manure.
A product created by the American farmer, cow pots will decompose much faster than peat pots and will provide your young plants with organic fertilizer as they decompose.

Recycled Paper Pots from Botanical Interests
These are another eco-friendly alternative to plastic pots.
The nice thing about the paperboard pots is the bottom is perforated, so it will tear away before planting.
This will reduce disturbing the seedling’s roots and ease the transition into the garden.
Caring for your Basil Seedlings
It’s always exciting to see the little seeds break the soil. Now you need to take care of them. Use the following guidelines & you should do just fine.
Watering your Seedlings
These are general guidelines – every environment will be a little different.
- Water your seedlings about twice a week. This may fluctuate depending on the humidity in your environment. When the top of the soil looks dry, it is time to water.
- Always water from the bottom. Your seedling will drink from its roots, not the base of the plant. If the top of the soil is too wet, it could lead to mold growth. The best way to do this is to put the pot into a bowl of water until the top gets wet. Then remove the pot & put it back in its saucer. If the saucer is big enough, you can also just fill the saucer. Once the top is wet, pour out any extra water.
- When your seedlings get older and move to a larger pot you can use a soil moisture meter to keep help you determine when your plant needs to be watered.
Providing Enough Light
Basil loves the warm sun. Make sure your plant gets at least 6 hours of sunlight from the window.
If you are growing basil indoors, you will almost always need to supplement with additional sources of light such as CFLs or grow lights. Even an ordinary light bulb placed very close to a single plant will work in a pinch.
Just like people, seedlings need extra TLC when they are young.
In the early growing phases, you need to provide as much light as possible to create a healthy well-branched plant. 12-16 hours of light is recommended for young seedlings.
Shop lights are very commonly used to grow seedlings indoors. They are long enough to provide light for multiple seed trays and are easily adjustable.
- Position your plant about 2-3 inches below your lights. As your seedlings grow, raise the light source.
- Put the lamp on a timer, so it turns on when there is no light coming from your window. Adjust the timer, so it stays on long enough to give your plant 16 hours of light.
For example, if the direct sun coming in from your window is 7 hours (9 am to 4 pm), set your timer to turn on at 4 & off at 1 am or 9 hours. If you are growing your seedling away from the window, then set the timer to keep the light on the full 16 hours.

Air Circulation
Plants need good air circulation & movement to remain healthy. Think about how they grow outside with the wind blowing. This does two things.
- The wind keeps the air moving to provide a constant supply of fresh air & good circulation. Stagnant air can lead to the seedlings staying too wet & growing mold.
- It also helps the seedlings develop good thick stems as it needs to be strong to stay upright. We are trying to replicate those same conditions indoors.
Place a small fan on its lightest setting pointing toward your seedlings. It should be just enough of a breeze, so they flutter slightly, not too strong, so they look like they are in a tornado. You can put this fan on the same timer you have for the light or just turn it on a few hours a day.
If you don’t have a fan, then do the following:
- Give them space. Make sure the seedlings have enough space between pots. There should be at least 6 inches between each pot & definitely don’t let the plants themselves touch. Rotate them on a regular basis.
- Brush them. Gently run your hand over the tops of the seedlings each day. Do this a few times. This will simulate movement caused by the wind blowing helping your seedlings to stay strong.
Pruning Basil Plants
The basil you see in the supermarket & in the garden magazines is bushy & beautiful. But basil will not grow this way on its own. If you don’t prune your basil plant it will grow straight up & not produce enough for all the great recipes you will want to make.

The key to getting a nicely branched, bushy plant with lots of leaves for picking is to prune it early & often. This is often called pinching.
You should do this every few weeks to make the most from your basil plant. The first time to do this is when the plants get to be about 6 inches high when it has between 3 & 5 sets of leaves.
The first set of leaves you see will be the cotyledon or seed leaves – those don’t count & will fall off as your plant grows. The next set of leaves to grow are called the “true leaves.”
You can start pruning your basil plants as soon as they have three sets of true leaves. There will be one on top & two sets on either side of the main stem.
Once the two smaller sets start growing, you can cut off the main stem just after the set of leaves. Your plant should put out two more stems about where the leaves are.

After the new shoots are about 4 inches long, repeat this process on the new stems. You can use the cuttings for your next meal.
Watch the Video
Watch the video to see a demonstration on making the first cut to trim your basil seedlings.
Transplanting Young Basil Plants
If you have started your basil in a small starter pot, you will need to transplant it once or twice during the primary growth phase. The first time will be after your basil has a few sets of true leaves, you can transplant it to a larger pot, about 4-5 inches in diameter.
See this article for a walkthrough and video on transplanting young basil seedlings: How To Transplant Basil Seedlings Into Individual Pots
As the basil grows, you will need to transplant one additional time to allow the plant to reach its full potential. Once you notice the roots growing out through the drainage holes is a good indicator your plant needs a larger pot.
If your plant has outgrown its pot, you can move it to a bigger one. Growing plants in too small of a pot can lead to unhealthy plants.
This is referred to as a root-bound plant. Rootbound plants will require more water, not get enough nutrients since there isn’t enough soil to go around & the plant’s growth will be stunted. Unhealthy plants are also more prone to pest infection & disease.

When the roots grow out and up through the drainage holes, it’s time for a larger pot.
Harvesting Basil
You can start harvesting your basil as soon as it has 6 or more leaves.
When you are ready to harvest your basil, you want to cut off full stems similar to the way we pruned it This will promote a nice bushy plant & it will continue to grow & produce ever more leaves & branches.
Select a tall section & look down on the branch to where you see 2 leaves. This is a good spot to cut, just after the 2 leaves. Depending on how much basil you need for your recipes, continue this process around the plant.
Snip the leaves off & discard the stem. Store the leaves on a damp paper towel & Tupperware or baggie until you are ready to use them. If it will be longer than a day or two, see the section on storing fresh herbs.
Growing Healthy Basil from Seed

The most important takeaway when growing basil or any other herbs indoors is to remember to have fun. You will make a few mistakes along the way, but such is the way of growing plants. It is easy enough to start over especially when growing annual herbs since they grow so quickly.
Growing basil from seed is the easiest way to grow a large number of plants for a very small sum. You can also grow many more varieties of basil since only the basics are typically available in the markets.
Why not grow some lemon or Thai basil for a little spice this year?
But regardless of the type you grow, be sure to start some basil from seed this season. It is not only rewarding to watch your seedlings thrive but an excellent way to start off the growing season.